
Tips & Tricks
7 ways to avoid over-compression
Think of compression as being the spice in your mix hotpot - the ingredients come to life with just the right amount of seasoning. When added thoughtfully, your mix will sound balanced and every instrument, every nuance of your vocals will be perfectly audible and clear. On the other hand, if it is overused or incorrectly applied, the balance will be completely off, like an oversalted dish.
Compressors are great tools for taming dynamics and making subtle characteristics of a sound more noticeable. They are important for shaping your mix, helping to position and layer instruments and vocals, and adding color and density to your music. But, unlike other effects, such as equalization or reverberation, adjusting compression and amplitude over a longer period of time as part of the work progress, tends to make the actual effect lose its magic. Many engineers - not only those who are new to mixing - have a hard time hearing the subtle, very granular details of how a compressor affects the signals.
Oftentimes over-compression is the result of hours of fine-tuning the amplification and ultimately counterproductive.
What does over-compression sound like?
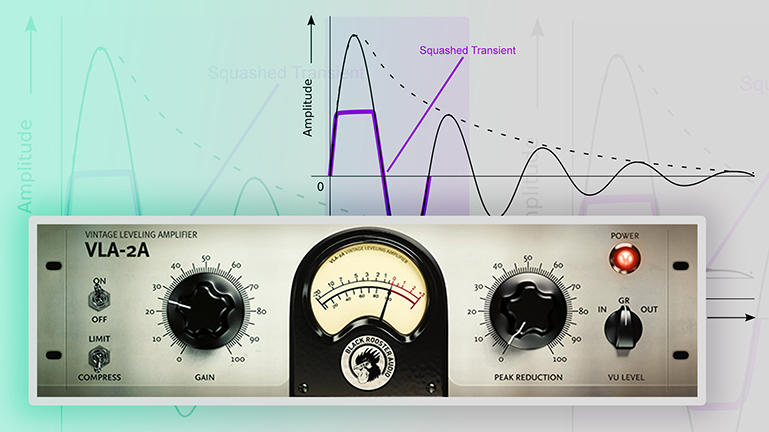
By squeezing the amplitude too far above the threshold, your signal can go dull. It somehow feels like you are losing the ability to spot the signal you are working on, either in the mix or by itself. This is because the compressor is working so heavily on the signal’s peaks, that it is flattening the transients.
Transients can be considered the footprint and main characteristic of any audio signal - because of them, you are able to distinguish between instruments, voices, and other sounds. So to organise the many layers of modern day mixes, you should aim for clean transients for overall clarity. Your compressors should only ever support the transients, and never squash them - “stabilizing” the energy of the following sustain.
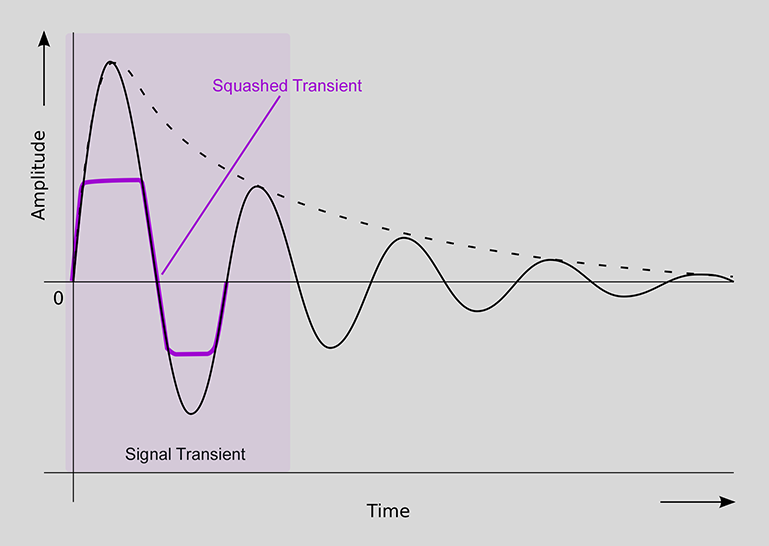
With a dull, over-compressed signal, there’s often a misconception that adding more compression to compensate for those faint peaks is a good idea. However, in most cases, the transient is already “lost”.
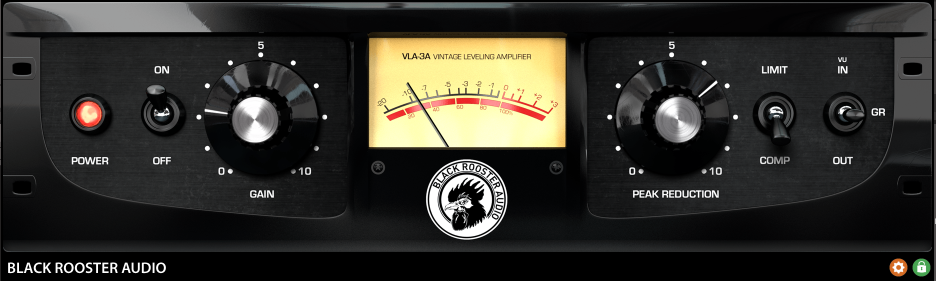
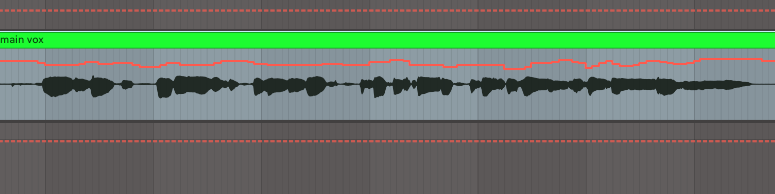
As you can see in this screenshot, the VLA-3A plug-in is over-compressing my vocal sample. You will notice almost -10db of peak reduction on the meter, which is already causing a lot of “damage” to the amplitude. So, when listening to my vocal samples, the compressed version sounds lifeless and quiet with no gain compensation.
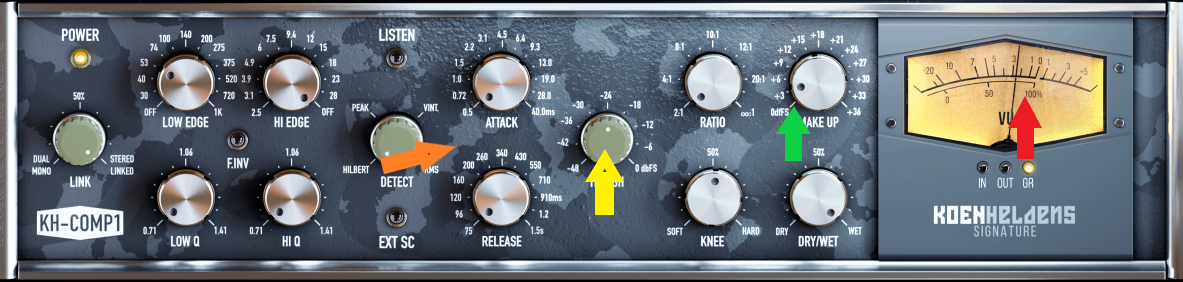
Looking further: As with many compressors like the VLA-FET or the KH-COMP1, you are able to manipulate the “attack time” of the compression on your signal. This time coefficient determines when the gain reduction (compression) is going to happen - so with short attack times, you are probably also affecting the transients and cutting them off.
In addition, the “release time” parameter of many compressors allows for controlling how long a signal is compressed for after reaching a defined trigger (threshold). In that scenario, which mostly affects the sustain of the audio, parts of the signal may be unwantedly densified -- causing “pumping” and irrational “ducking” effects that will stress your ears further.
Over-compression must therefore be seen as a category of mostly unwanted, oftentimes complex missettings of the gain reduction and the attack and release time parameters on the leveling amplifier. As such, compressors can ultimately make or break your production; it really comes down to how you use them.
So, here are 7 helpful ways to avoid over-compression and get you that sound of your audio dreams.
1. Adjust threshold - not ratio
The threshold knob of a compressor tells the compressor at which level it should start compressing. The ratio, on the other hand, determines the amount of gain reduction compared to the original signal. If your threshold is too low and you are working on a high ratio, you’re essentially telling the compressor to heavily compress the entire signal, which could be way too much and lead to a seriously lacklustre sound.
Here’s an example for taming vocals:
Set the threshold 3-4 dB below your vocalist’s signal-peaks and dial in a decent ratio of 2:1. As the new ratio will suppress the peaks, add in some gain at the output stage (add half of the threshold, as we are densifying at a factor of 2) - this should result in a more present vocal sound. To intensify the effect, instead of further squeezing the signal with higher ratios, try to widen the range of amplitude that “feeds” the compression: take the threshold down to 6db or 12dB or add a little gain at the input stage. The ratio of 2:1 will affect the signal just enough to not squash the transients, while the overall signal will be brought to life.
A few of the Black Rooster Audio’s plug-ins are fixed threshold compressors, meaning you adjust the input gain to adjust how much compression is being applied. You’ll want to keep this in mind as different fixed threshold compressors can give a different sound and you’ll likely have to work with the input gain for the above adjustments!
2. Test different attack and release times
One important feature of most compressors is it’s attack and release time.
The attack time tells the compressor how fast it should begin interacting with the audio. Having a fast attack time on your compression will increase the amount of compression happening, and could lead to over-compression. This will squash your transients and make your audio sound completely flat, preventing you from identifying the position of the signal’s source - both in depth and in the stereo domain. Fast attack times for compressors are generally between 0 and 10 milliseconds, while slow attack times are somewhere between 15 and 100 milliseconds.
The release time is the time it takes for the compressor to relax after the signal has fallen below the threshold. Having a fast release time will cause less compression on your signal over-all and can add dynamic shape to your sound. A slow release time will add more compression but can add body and depth to your sound as well. Fast release times are generally between 0 milliseconds and 120 milliseconds, and slow release times can be anywhere between 500 milliseconds and 10 seconds.
So for our over-compression scenario, let’s start with widening the attack time window (longer attack), for those transients to shine through, and shorten the release.
From there, narrow the attack to the degree where you begin encountering a loss in high-end frequencies and drive it back just a little - this is your sweet spot for gentle compression.
For the release time, add to it until you hear an imbalance from low-end to mids and highs, or until you hear pumping, then drive it back a little. The longer release time should not affect the longer sustains too much. It is essential to find a position where your signal is both stable in frequency and in amplitude.
Compressors without Attack and Release Times
Some compressors do not have parameters for attack and release times, like our own VLA-2A vintage leveling amplifier. That’s because like all opto-electronic compressors, these parameters are automatically set in the device and have become a part of the sound. Opto-electronic compressors generally have a slow attack time and a very dynamic release based on the signal. Both of these lead to a smoother compression.
So, if you’re having a hard time figuring out exactly where to set your attack and release time, the VLA-2A or the VLA-3A are a godsend for simple-to-use yet highly intelligent alternatives.
3. Avoid adjusting compression outside of the mix
Oftentimes when working on a dense mix, engineers will choose solo elements and fine-tune compression outside of the mix. For experienced engineers, this is a great way to be intentional with compression and to understand how it’s being used. But it can easily lead to over-compression, as the isolated context will completely water down the intensity of the effect on your ears. Thus, by allowing for the full context to be audible, you’re maintaining a constant “reference” for your gain reduction to be put into perspective.
It’s a balance of both that will help you get the best sound, but soloing elements can play tricks on your ears and convince you things may sound good when they, in fact, do not. We recommend listening in a fashion of alternating isolation and full mix, in order to truly get the feel of the compressor you’re using.
Additionally, heavy compression may be appropriate for your vocals if they need to stand out in a dense mix with heavy guitars or synths, but it can’t correct unbalanced gain levels. Be sure to adjust the gain of surrounding instruments as you compress, to really be able to hear what you're working on in the mix. Gain and compression needs to go hand-in-hand for positioning and layering your source signals in a mix.
4. Reference listening
Since we’re talking about utilizing your own mix as a reference for applying compression to both single or whole tracks, here’s another tip: it’s always a good idea to utilize a well-known tune as a reference for both your vision and a refresher for your ears.
Over-compression is a very complex effect that can cause a frequency imbalance, “wandering” sources, pumping, and transient squashing, among other issues. And the deeper you are into your mix, the more and more your ears will adapt to that sound, making the compression effect more subtle and ultimately have you working counterintuitively.
5. Use volume automation with compression
Specifically for vocals, volume automation inside your DAW will work hand-in-hand with your compression. It will ensure you don’t have to push the compressor too hard to hear every word the vocalist is saying. Just like we mentioned in tip 1, adjusting the gain before the compression by selecting the right threshold, input gain, or automated gain, will work wonders and have you never over-compress again.
If you’re someone who already does volume automation on your vocals, we recommend the BlackAsh Compressor. By fine-tuning your peak reduction knob, you can easily curve those peaking transients for that smooth vocal sound of your dreams.
6. Turn your compression OFF
Sometimes you don’t need a compressor, but rather an EQ or Transient Designer to help shape the sound in a more effective way. Inexperienced producers often overuse compression as their go-to approach, because they believe it's necessary on every track. But compression isn’t the holy grail of mixing hits - sure, it does amazing things but it should be used intentionally and only as needed, instead of being a given on every track.
For example, if your vocalist has an even delivery and the recording engineer added some light compression while it was being tracked, you might not even need too much compression, if any at all. We recommend you experiment with this and really listen to identify what needs to be adjusted.
7. Practicing the art of over-compression
We know this article is all about how NOT to over-compress, but hear us out. Think of it like this - how can you know if something is right or wrong, when you have never experienced it? With that said, we encourage you to use various sources and plug-ins to intentionally over-compress, so you can fully understand its effect. This is ear training and it will allow you to identify potential issues with your compression settings. Additionally, it will allow you to put the over-compression effect into perspective - it can be a little disturbing and unpleasant on the ears, but that’s the whole idea! Train your ears and master it well!
When over-compression can actually work for your mix.
Yes, it can make signals sound more dull or squashed, but with enough training, you can also use it to your advantage. In fact, with a well-trained ear and a thorough understanding of your particular compressor, overdoing this effect can actually allow you to add body, depth, and movement to your music!
We love to use over-compression on drums in parallel to add some movement to the whole kit. And with a fast attack time and slow release time, you can also create powerful pumping effects. Our VLA FET Compressor is great for this.
So, now that you know over-compression can be used as a tool for both good and evil, it's important to be intentional with it so as not to flatten your mixes, but rather liven them up. For new producers, our plug-ins are a great place to start learning about compressors and how to use them effectively. You can take advantage of our 14-day trials and get acquainted with our superb selection of leveling amplifiers. Incredible sounding audio awaits!
Add a comment
You need to be logged in to add comments.
Comment by Ken |
Fantastic read! Thanks for all the info. It was really helpful to have examples of attack and release times for fast and slow settings. Cheers!
Comment by Jon Clark |
I teach audio production at a community college and this couldn't be more timely. I'm sharing with my students!
Always good to be reminded to watch for too much of any good thing.
Comment by sana sad |
I like the "practice over compressing" tip !
Comment by Gabe Hizer |
Actually, release time refers to how long the compressor will take to relax the compression once the signal has fallen below the threshold level not once the signal has stopped.
Comment by Roger Dunn |
Helpful article. Thank you. Compression has been a weakness of mine forever.
Comment by Alexia |
I got endorse by other plugins developers, I just got to know and use BlackRoosterAudio plugins thanks to Focusrite. I am so thrilled about how good they sound, the informative tips & tricks for everyone (beginners and pro) that you guys share on your website. knowledge is power. I will download some more plugins to test them out. I am already pleased with the ones I have from B.R.A. Keep Up The good work!
THX!
Alexia
A.lexia R. T.
LexMusicPROductions©
London, UK.
www.facebook.com/SUPADJALEXIA
Comment by Geoff |
I came to the conclusion that I was over compressing after intensively working on my mixing skills for 2 years. I have found that the best results for me come from selecting the right compressor, and setting the peak & ratio to a point where there is an audible difference (a gentle squeeze or fattening of the signal) with the compressor on vs bypassed, but the gain reduction needle/meter never actually moves. The VLA-2A mkII has been a revelation for this technique. And it ensures I'm not over processing the signal.
Of course, in order for this to work, one does need to automate their audio signal if the volume fluctuates all over the place.